Setting the Pitching Rubber
There are 4 key parameters that have to be right — elevation, distance, levelness, and square.
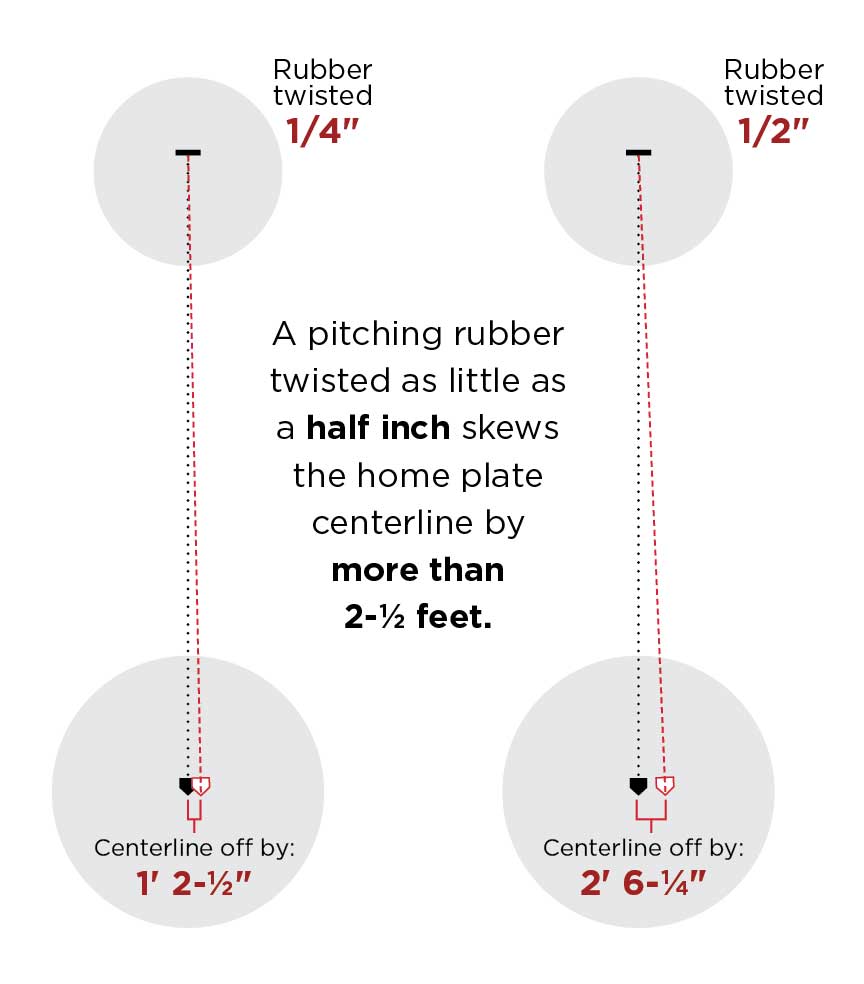
When a half inch becomes two feet.
 Ever stood on a pitching mound and noticed the rubber was twisted? While most might think that it is not a big deal, ask a pitcher, a pitching coach, or a trainer how even a minor twist can have major effects on a pitcher’s mechanics.
A pitching rubber that is just slightly turned by ¼” on a Major League mound will move the centerline off-center from home plate by 1.15°, or 14½”. A rubber that is twisted just a little more to a ½” will throw the centerline off by 2.39°, or more than 2 ½ feet! That messes with a pitcher’s mechanics and increases wear on their arm as they work to compensate for the misalignment.
The the apex of home plate is the benchmark of a ballfield. Everything is laid out based on its placement. The pitching mound and its rubber are equally critical for a pitcher.
Elevation, distance, levelness, and square.
These four parameters require absolute perfection in order to successfully install a pitching rubber to specification. Elevation, distance, levelness, and square are interdependent. Adjusting any one of these four parameters will require you to check the other three to ensure they are still correct.
- ELEVATION. The elevation of the pitching rubber is measured in respect to the elevation of home plate. A mound that is ten inches tall has a pitching rubber surface that is exactly ten inches higher than the surface of home plate. Most infields incorporate a slope in order to facilitate drainage from the infield. This will reduce the height of your soil mound.
For example, if you have three inches of slope from the base of the mound to home plate and need to build a ten inch mound, the actual mound of soil you build should only be seven inches in height. Use a transit or builders level to measure the height of the home plate surface and pitching rubber surface. Ensure that you have the correct change in elevation between the two. Some fields have irregular surface grades and may tilt in odd directions. In these situations, it might be easier to build the mound ten inches higher than the ground immediately surrounding it. - DISTANCE. When the rule book lists the pitching distance for a ballfield, it is describing the distance from the apex of home plate to the front center of the pitching rubber. By the way, that is the apex of the white portion of home plate, not the black portion. This distance should always be measured using a steel tape when possible. Fiberglass tapes can stretch considerably over distance thereby threatening the accuracy of the measurement.
- LEVELNESS. Now that you know precisely where the rubber will be located, it’s time to level it. Level is checked in two directions on the rubber: from side to side and front to back. A torpedo level will work best for this portion of the installation. Be sure that the pitching rubber you are working with is in pristine condition. Any bubbling of the rubber will make it impossible to achieve a level pitching rubber.
- SQUARE. Once the pitching distance is correct, checking to make sure the rubber is square to home plate is the next critical measurement. On the pitching rubber, find the center and mark it with a pencil or pen. Then, run a very taut string line from the apex of home plate to the center of second base. Pop the string three to five times to see where the line settles. Ideally, the string will fall on the center line of the pitching rubber.
Make sure it’s square.
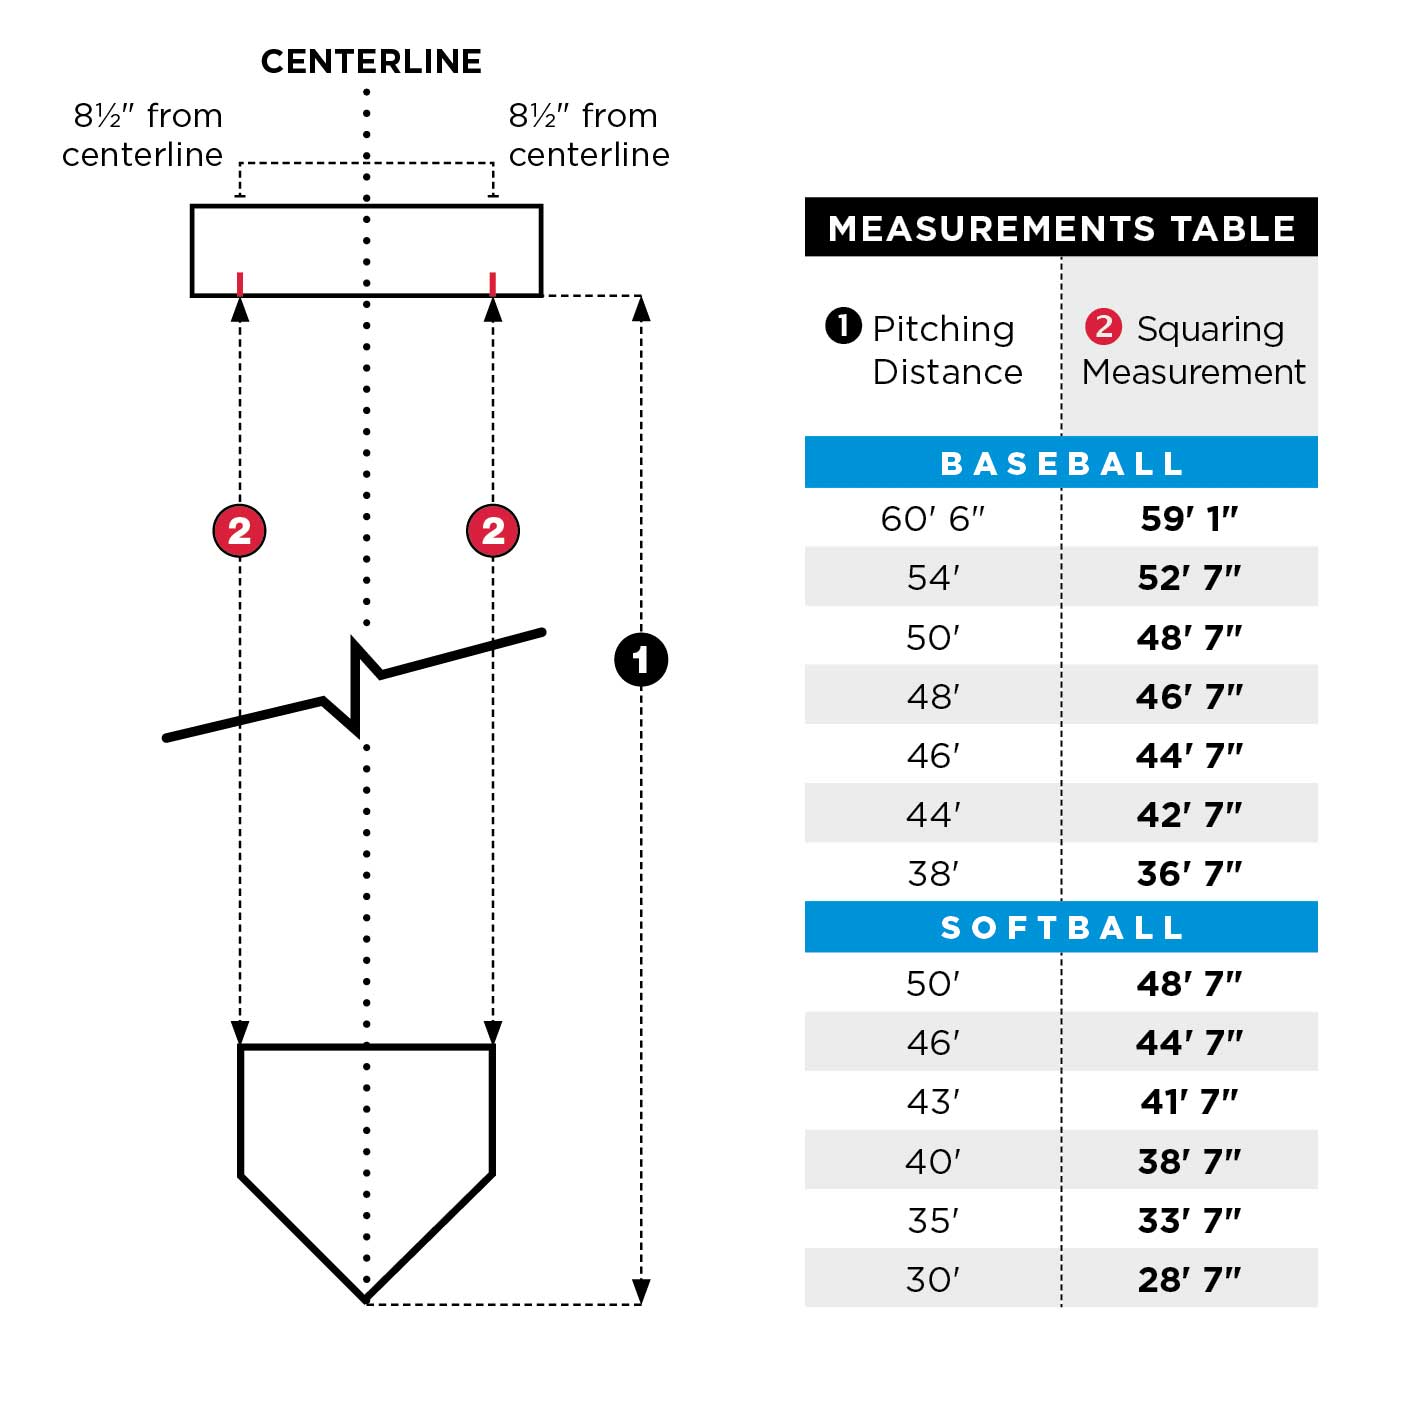 To accurately determine if the pitching rubber is square, you’ll need to measure from the square portion of home plate. On the rubber, measure 8½” in both directions from the centerline and mark those points on the front of the rubber (see illustration). Using the Measurements Table (right), find the pitching distance for your ballfield and reference the squaring measurement.
Measure the distance from the front square corner of home plate to the front of the pitcher’s rubber at the 8-½” mark you made earlier. Repeat this measurement on the other side, from the opposite corner of home plate to the front of the pitcher’s rubber. These measurements should be the same when home plate is square to the pitching rubber.
If these measurements are not the same, then the pitching rubber needs to be adjusted by twisting it slightly until the measurements match. Each time you manipulate the rubber to bring it square, re-measure the pitching distance and the two squaring measurements on each side of the rubber until they all meet the specified distances shown on the Measurements Table.
When all four of the parameters have been met — elevation, distance, levelness, and square — double-check each measurement one last time before backfilling around the rubber. After compacting around the rubber, do one final check on level, distance, and square to ensure the compacting process did not throw the rubber off its mark.
Perfection is your goal.
Installing a pitching rubber can be tedious. It is one ballfield task that demands both accuracy and patience. It can take as little as 15 minutes to set the rubber, or it can take as much as an hour. In either case, perfection is your ultimate goal.