Being off just a little really means a lot
In my travels around the U.S. over the years I’ve seen a lot of softball and baseball fields. There is one thing that has always irked me: the astonishing number of fields I’ve seen where the pitching rubber is not square to home plate. Sometimes, it’s not even CLOSE! I’m talking about fields at all levels, from the MLB all the way down to the youth leagues. Main mounds and bullpens alike are affected here.
The Impact on Pitchers
While many people think having your pitching rubber “close to square” is close enough, please consider this…
If your pitching rubber is twisted off square by a mere ¼” on an adult baseball field (60′ 6″ pitching distance), the centerline at home plate will jump off by 14 ½” to the left or right, depending which way the rubber is twisted. Increase the skew in the rubber to ½” off square and you move that center line off of the center of home plate by an astounding 2′ 6 ¼”!
An misaligned rubber will affect a pitcher’s pitching mechanics. Ask any pitching coach or trainer. How can the pitcher square to the plate in his wind up when the front edge of the pitching rubber is not even square to the plate? Because of that, they must adjust, and this is where bad habits begin. As they adjust their mechanics, it can increase wear on a pitchers arm or other parts of the body as they work to compensate for the misalignment.
How to Square Your Pitching Rubber
The apex of the home plate is the benchmark of a ball field. The centerline of the field runs from that point through the center of the pitching rubber to the center of second base. The front edge of the pitching rubber should be exactly perpendicular to that centerline. Follow these simple steps to make sure you start squaring your pitching rubber off right.
- On your pitching rubber, measure and scribe with a pencil a centerline down the center of the pitching rubber.
- Set up a string line that runs from the apex of the home plate to the center of second base.
- Make sure it is extra tight so there is little chance for side-to-side movement.
- Pop the string line over the top of your pitching rubber several times to figure out the average spot it lands on the plate.
- Check to make sure the string line is landing over the center line scribed on the rubber. If not, you need to adjust the rubber side-to-side in order to get it in the right location.
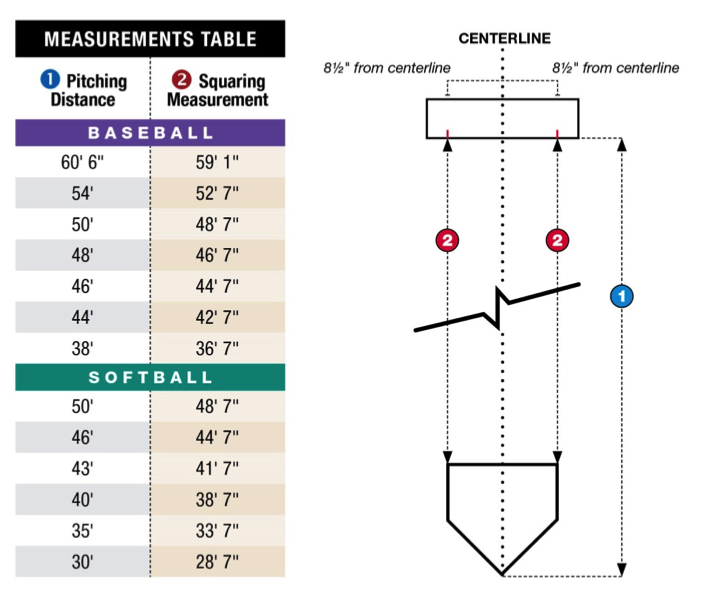
- Next, measure from the apex of home plate to the front center edge of the pitching rubber. Once you’ve measured out the proper pitching distance, then measure out 8 ½” from the centerline on either side of the pitching rubber and make a mark.

- Now measure from the front of the rubber at those marks, to the respective front corners of the home plate, as it shows in the table and drawing above. If the pitching distance and the squaring distance equal what is suggested on the chart, then your pitching rubber should be square to the plate.
- Remember, when setting your pitching rubber, there are 4 parameters to repeatedly check as you are setting a pitching rubber. Square to the plate is just one of them. You must also check and recheck your distances, the levelness of the rubber and it’s elevation several times during the placement of the rubber.
For expanded directions on setting a pitching rubber, consult Beacon’s Ballfield Dimensions and Resource Guide online version or you can order a print version of the Ballfield Dimensions Guide if you don’t already have one.
Take it from Huey Lewis and the News:
But don’t you try to fight it, an idea whose time has come;
Don’t tell me that I’m crazy;
Don’t tell me I’m nowhere;
Take it from me;
It’s hip to be square!The pitchers and catchers who use your fields will thank you… because it’s hip to be square.

